
A Guide to Solo Hiking Tre Cime di Lavaredo: Tips for Women + First-Timers
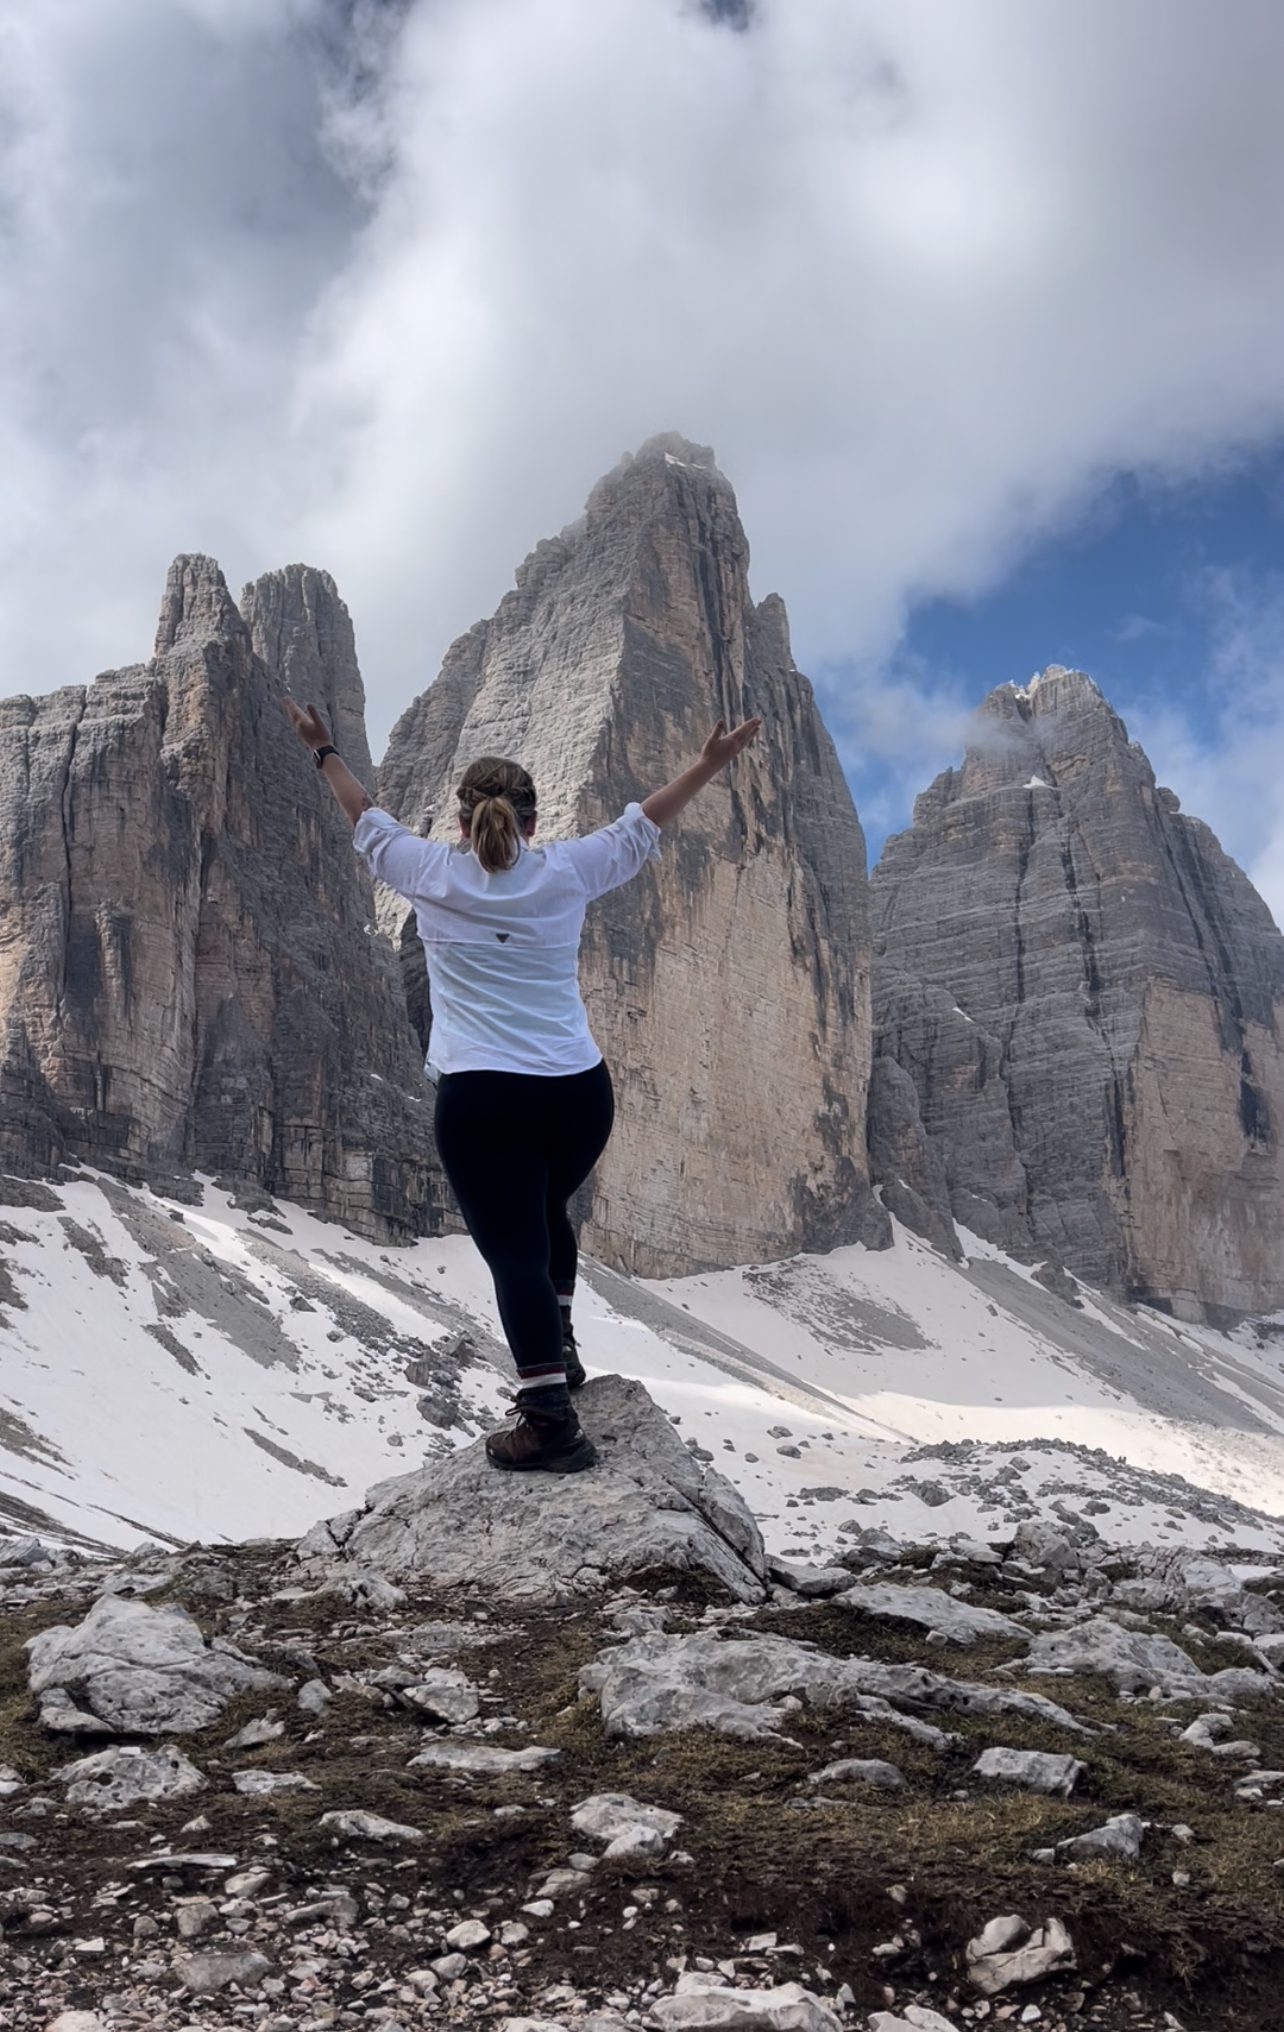
The first time I saw Tre Cime di Lavaredo, I stopped in my tracks. These three jagged limestone peaks tower over the Dolomites like something out of a fairytale—and I was about to hike around them, solo.
I set off on the famous Tre Cime loop with my Osprey 38L pack, hiking boots, and a whole lot of determination. The Tre Cime Di Lavaredo, 10 km (6.2 mile) trail is iconic for good reason, it’s dramatic, accessible, and seriously rewarding.
Whether you’re solo hiking in the Dolomites or planning a girls’ trip in the Alps, this guide walks you through exactly what to expect. From the new 2025 shuttle and parking updates to essential gear and empowering safety tips—plus nearby side hikes—this is everything I wish I knew before I went.
Because yes—you can hike Tre Cime di Lavaredo solo. And it might just be one of the best things you ever do.
This Post Pairs Well With:
- View my other Hiking Guides
- The Best Fall Hike in the Dolomites: Croda da Lago + Lago Federa
- How to Get From Venice Marco Polo to Cortina di Ampezzo
- Your Ultimate Guide to the Dolomites: How to Plan the Perfect Trip
- Overtourism in the Dolomites: Is Cadini di Misurina Still Worth It?
- Easy Day Hikes in the Dolomites: Val Venegia & Sentiero Marcio
- How to Make a Reservation at a Rifugio (2025 Guide)
- What to Pack for a Solo Hut-to-Hut Trek in the Dolomites (AV1, AV2 + Palaronda Tested)
At a Glance:
Tre Cime di Lavaredo for Solo Travelers
Location: Dolomites, Italy (border of South Tyrol & Veneto)
Trail Type: Loop hike (counterclockwise or clockwise)
Distance: ~10.3 km / 6.4 miles
Elevation Gain: ~400 m / 1,300 ft
Time Needed: 3–4.5 hours at a relaxed pace
Start Point: Rifugio Auronzo (2,320 m / 7,611 ft)
Best Season: Late June – Early October
Solo Difficulty Level: Moderate (good for beginners with basic fitness)
Safety for Solo Female Travelers: Very high — busy trail, no technical sections, many bail-out options
Crowds: High midday June–August, better early or September
Toll Road Access: €30–€40 + mandatory online reservation in 2026
Public Transport: Buses from Cortina, Dobbiaco, and Misurina (seasonal shuttle 444)
Rifugi Open: Late June to late September (Locatelli, Lavaredo, Auronzo)
Dog-Friendly? Yes (but keep leashed; popular with families)
Where Is Tre Cime di Lavaredo?
Tre Cime di Lavaredo (or Drei Zinnen in German) sits inside the Three Peaks Nature Park, part of the Dolomites UNESCO World Heritage Site.
The area borders both Veneto and South Tyrol, which means you’ll see Italian and German place names everywhere.
Honestly, this is one of the busiest trails in the Dolomites. So keep that in mind. You won’t be alone. There will be crowds (thus why I think it’s such a great trail for solo hikers, especially new solo hikers)
Most visitors reach Tre Cime from one of three bases:
- Misurina – closest and easiest for early starts
- Cortina d’Ampezzo – stylish mountain town with great buses
- Dobbiaco/Toblach – great transit links and quieter vibes
- Stay at Auronzo Rifugio and Rifugio Locatelli for easier access to the Drei Zinnen/Tre Cime Lavaredo
If you want the smoothest experience as a solo traveler, Misurina is honestly unbeatable. It’s quiet, safe, walkable, and only a short shuttle ride from the trailhead.

Where to stay Near Tre Cime Di Lavaredo/Drei Zinnen
I based myself in Misurina for three nights, staying at the locally run Hotel Sorapis—simple, scenic, and right across from the lake.
The staff and hotel manager are pretty great. One night, the hotel manager noticed I wasn’t at dinner and got worried, and checked in on me! I thought that was a wonderful thought Bonus? The Bus to Rifugio Auronzo stops just a short walk away. I kept my car parked at the hotel for much of the time I was in the area, as it gets busy.
If Hotel Sorapiss is booked, use the map below to help you find a place to stay near Tre Cime Di Lavaredo/Drei Zinnen. I think proximity is important for solo hikers in the Dolomites so that I would look no further than Cortina and Toblach/Dobbiaco.
When it comes to planning a trip in the Dolomites, location is everything, and your time is precious; you don’t want to be spending most of it on the road!
Use the Zoom out function, and you can drag your mouse to find driving distances from different places!
How to Get to Tre Cime di Lavaredo (2026 Update)
Whether you’re driving, hiking in, or catching a shuttle, here’s what to know before you go. As of summer 2025, getting there takes a little more planning than just pulling up and parking. And honestly? That’s a good thing. More structure helps protect this fragile mountain environment and makes the experience smoother for everyone. This also helps with this viewpoint that you can hike out to while hiking around Tre Cime Di Lavaredo.
Driving to Tre Cime di Lavaredo (Rifugio Auronzo Parking)
Let’s start with the big change, which is an Important Update that occurred in the Summer of 2025:
To drive to Rifugio Auronzo, you must reserve a parking spot online in advance.
This new system was introduced to help protect the fragile alpine environment and manage overcrowding at one of the most visited hiking areas in the Dolomites.
Tre Cime is accessed via the toll road from Misurina to Rifugio Auronzo. But in 2026, this road is reservation-only from late May through mid-October.
This applies from late May through mid-October.
Here’s the website: Reserve your spot on the Auronzo information website
- Toll cost: ~€40 per car, paid online in advance
- Reservation required: No same-day access without a permit
- Book via: Comune di Auronzo di Cadore’s official portal (updated each spring)
- Entry time slots: Typically 12-hour windows (e.g., 6 AM–6 PM)
- Spaces sell out in high season (especially weekends), so book early
Overnight stays at the Rifugio Auronzo parking lot are not allowed. Campervans must book special slots and cannot sleep there without additional permits.
Driving Distances to Tre Cime Di Lavaredo
For reference, these are the driving times from various locations in the Dolomites to Tre Cime Di Lavaredo.
| Starting Point | Driving Distance | Estimated Driving Time |
|---|---|---|
| Toblach / Dobbiaco | 18 km | ~35 minutes |
| Misurina | 7 km | ~20 minutes |
| Cortina d’Ampezzo | 25 km | ~45–50 minutes |
| Lago di Braies | 32 km | ~1 hour |
| Seceda (Ortisei) | 110 km | ~2 hours |
Hiking to Tre Cime di Lavaredo (Free Access on Foot)
If you’re more the “earn your views” type, you can hike into Tre Cime without paying the toll. A few well-marked trails get you there on foot:
Trail 119: Starts at the toll road barrier and follows the paved road up to Rifugio Auronzo. It’s straightforward but not the most scenic.
Trail 108A: Begins near Malga Rin Bianco, climbing through Forcella Col di Mezzo with better views and fewer crowds.
Public Transport to Tre Cime di Lavaredo
No car? No problem. I chose to go this route from Misurina—and I’d do it again in a heartbeat. It was easier, more sustainable, and I didn’t have to stress about parking.
Dobbiaco (Toblach) Shuttle 444 runs from mid-June to late September, leaving from Dobbiaco train station and heading straight to Rifugio Auronzo.
You’ll pass scenic Lake Landro along the way.
- Operator: SüdtirolMobil
- Reservations required: Book early—it fills up fast
- Where to book: suedtirolmobil.info
The Only Hiking Apps You need For your Trip to the Dolomites
Did you know I compiled a full list of apps that will help you with your time in the Dolomites? SudtirolMobil is one of them! Click here to read more about smartphone applications that will help you with your time in the Dolomites!
From Cortina d’Ampezzo or Auronzo di Cadore
The Dolomitibus service runs directly to Tre Cime from both Cortina and Auronzo, with convenient connections from the Calalzo di Cadore train station.
Buses arrive at Rifugio Auronzo, the trailhead for the loop hike. You’ll want to book tickets in advance via the Dolomitibus app or website. Always check updated timetables—schedules vary depending on the season
If you are flying into Venice Marco Polo and need a quick reference for how to get from Venice Marco Polo to Cortina, click here
From Misurina
If you’re staying in Misurina (which I did), take the Dolomiti Bus from the Misurina, Genzianella stop. It was stress-free, scenic, and felt like a smart choice all around. You’ll also find trails from Misurina, Dobbiaco, Auronzo, and Val Fiscalina that lead into the Tre Cime Nature Park—ideal for longer, full-day hiking adventures. In shoulder season, when the toll road closes to cars, it remains open to walkers and cyclists.
Komoot Trail for Three Peaks/Tre Cime/Drei Zinnen
I used Komoot Maps to guide my way, but the trail itself is well-marked.
There are a plethora of routes on komoot to choose from
Hiking the Tre Cime Loop: What It’s Like
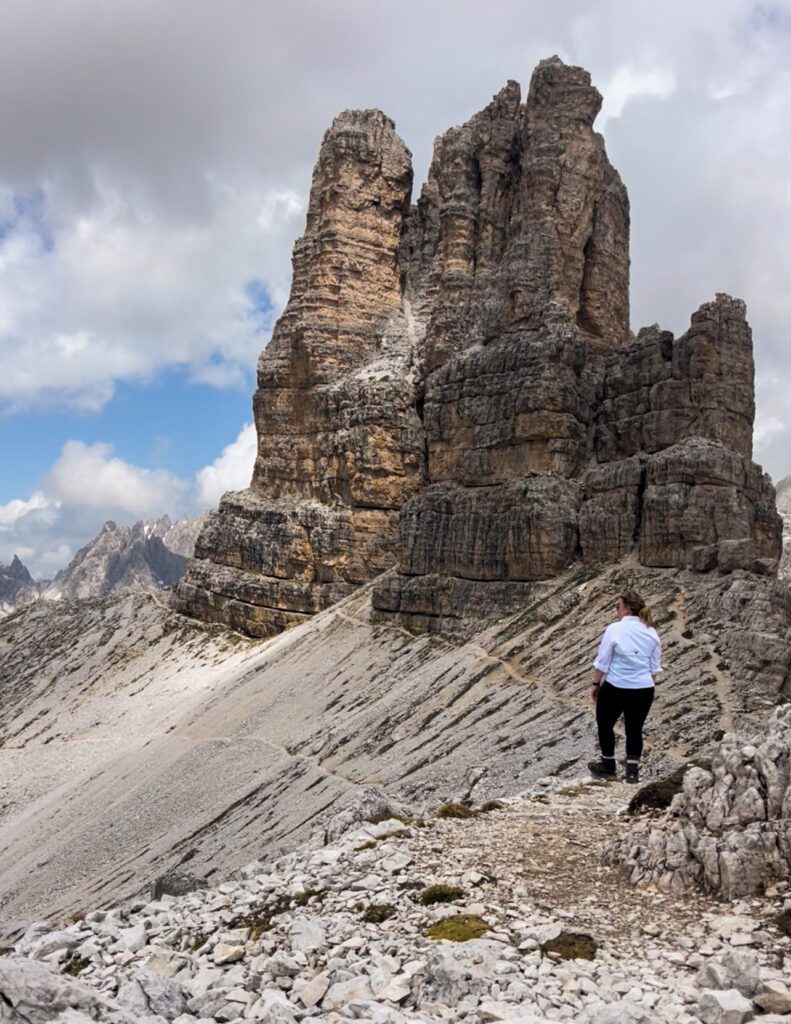
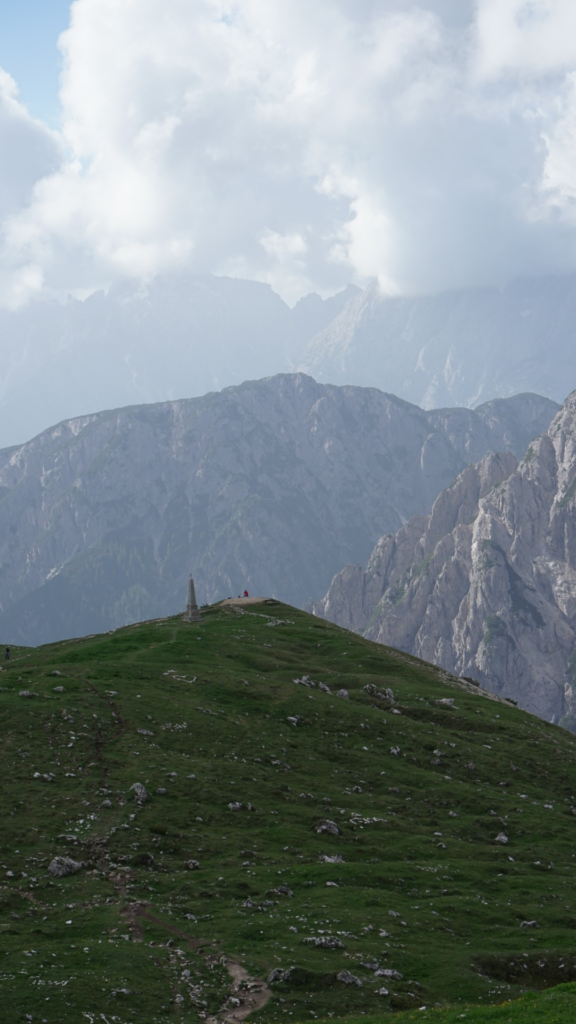
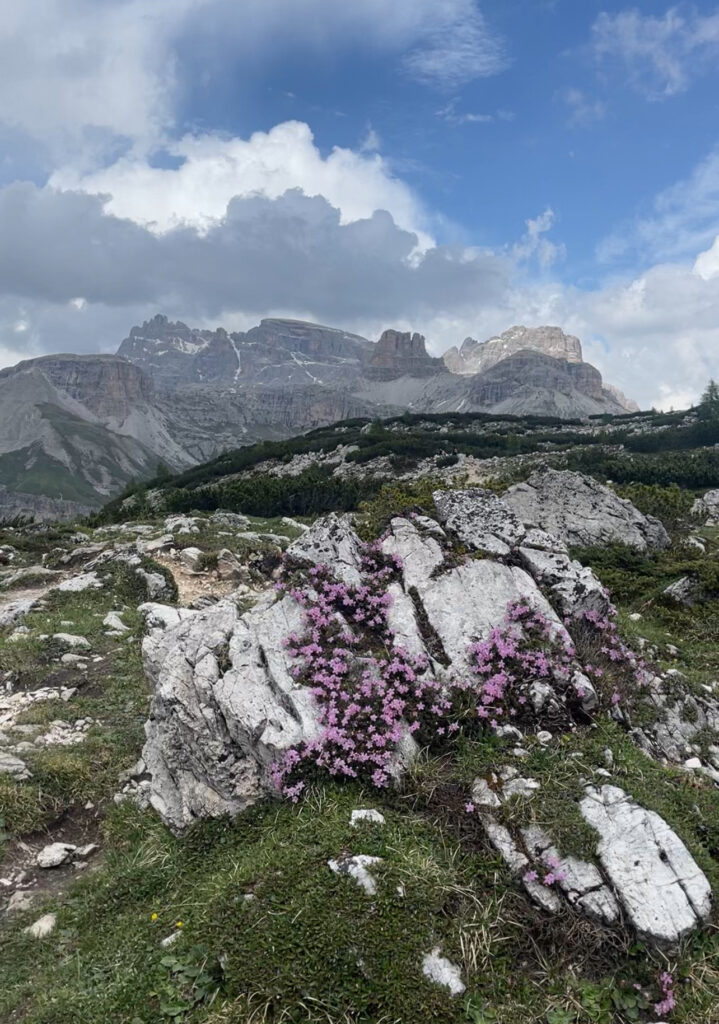
The trail itself starts at Rifugio Auronzo (2320m) where you’ll hop on trail #101. The first bit is easy: a wide, gravel path with views that hit you right away. On one side? The dramatic Cadini di Misurina peaks, just casually stealing the show.
About ten minutes in, you’ll pass Cappella degli Alpini, this tiny, wood-shingled chapel that kind of stops you in your tracks. I didn’t plan to pause there, but I did. It just felt right. That said, I noticed something that made me pause for another reason: people posing for photos among the gravestones. I’m not sure if folks realized what they were doing, but I want to gently say—let’s be better than that. This is a memorial. These aren’t just stones. They’re people. Please don’t treat it like a backdrop.

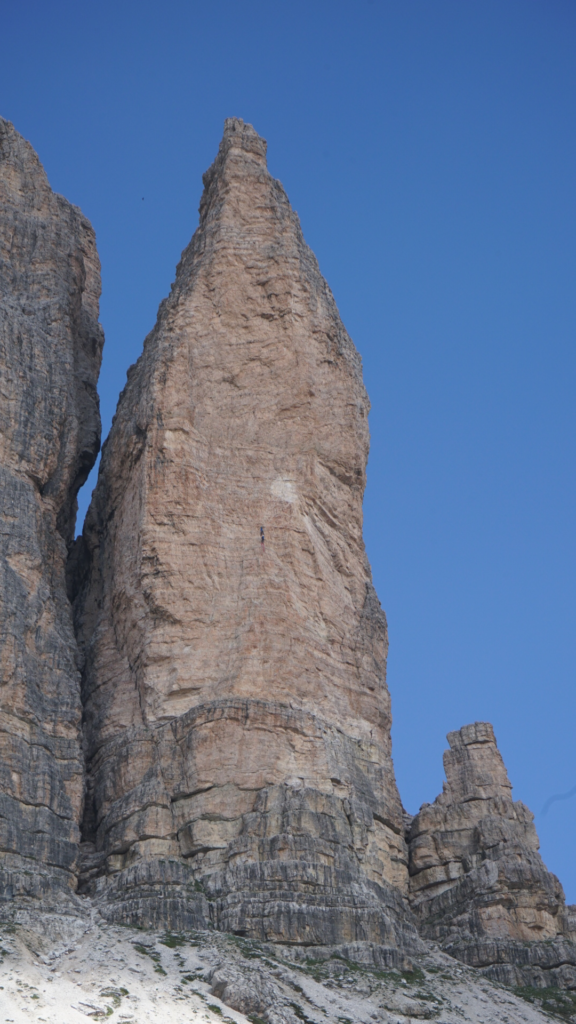
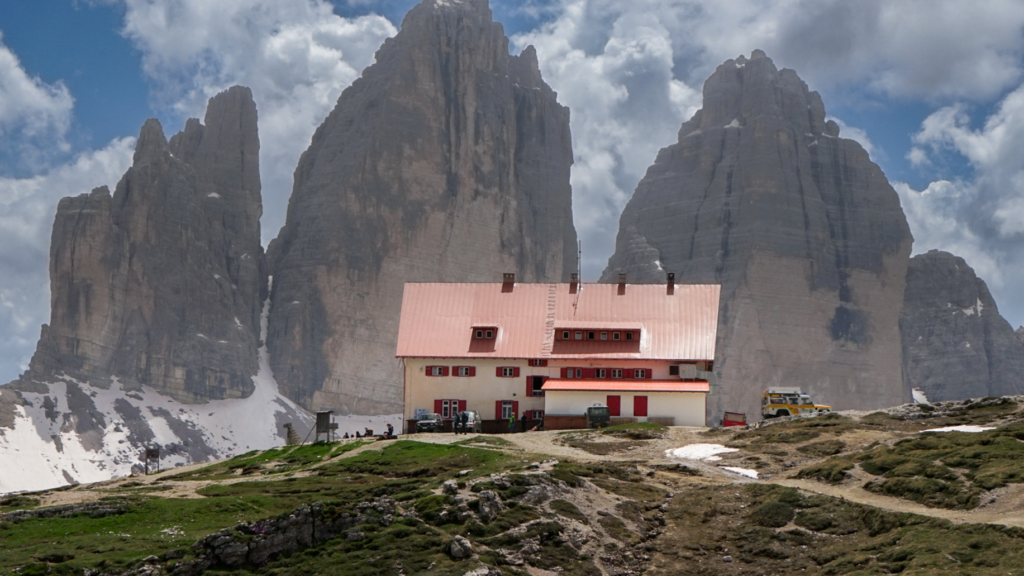
Soon after, you’ll reach Rifugio Lavaredo. I didn’t stop here long—it was packed when I passed by—but I did take a few minutes to snap some photos of the surrounding peaks with my Canon zoom lens.
I actually caught climbers scaling one of the ridgelines, which was pretty incredible to see in action.
There are bathrooms at Rifugio Lavaredo, but you’ll need a euro coin to use them. Worth knowing before you go.
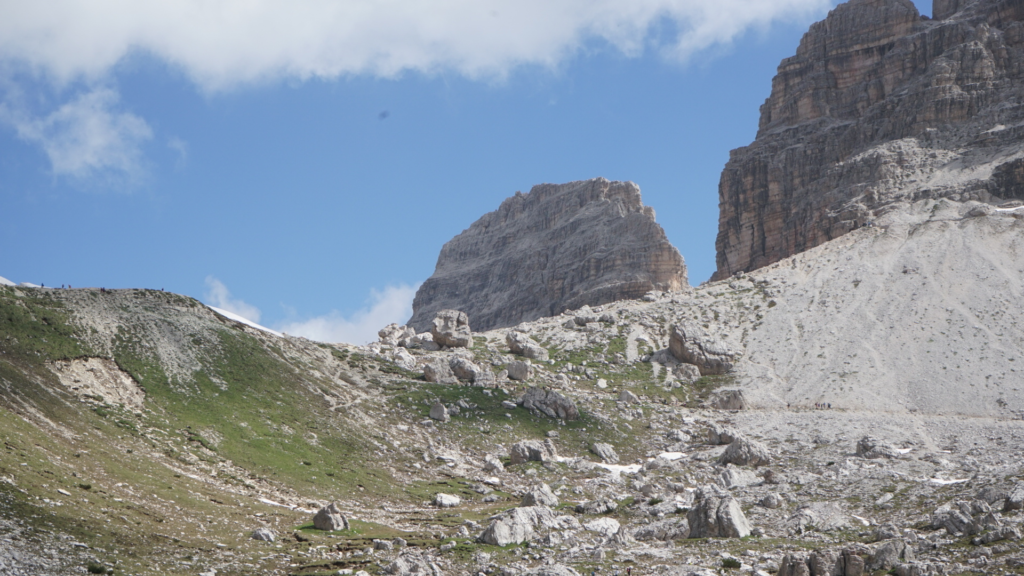
Forcella Lavaredo to Rifugio Locatelli
To reach Forcella Lavaredo, you have two options: a short, steep climb or a longer, more gradual path. I went with the gradual wraparound—it’s easier on the legs, and since I was hiking solo, I wanted to conserve my energy. It also gave me more time to enjoy the views. When I reached the top, the whole world kind of opened up. There was still a stretch of snow covering the trail—it was opening weekend after all—and I just stood there in awe.
You’ll probably do this too.
A kind young couple offered to take my photo, and it’s honestly one I cherish to this day. It captured a moment of stillness, strength, and pure joy. I lingered at the top for a while, just trying to absorb it all. From the Forcella, it’s about 2 km down to Locatelli. The trail gets rockier, but it’s not hard to follow. I kept stopping to turn around because the view of the peaks kept changing and somehow got even better from each new angle.
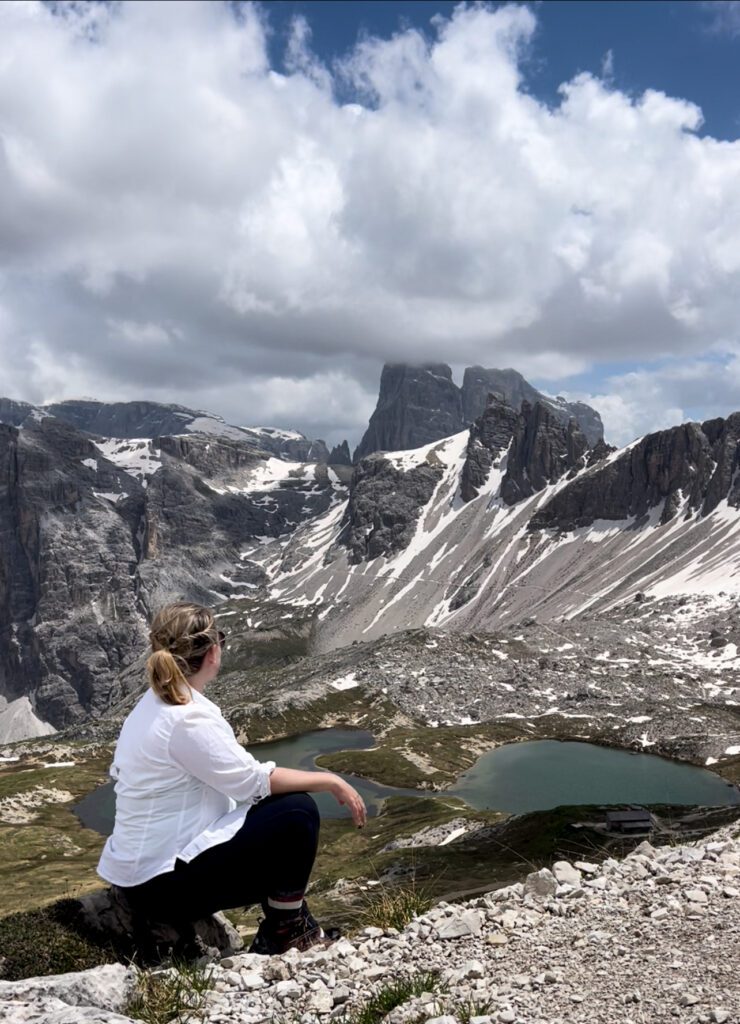
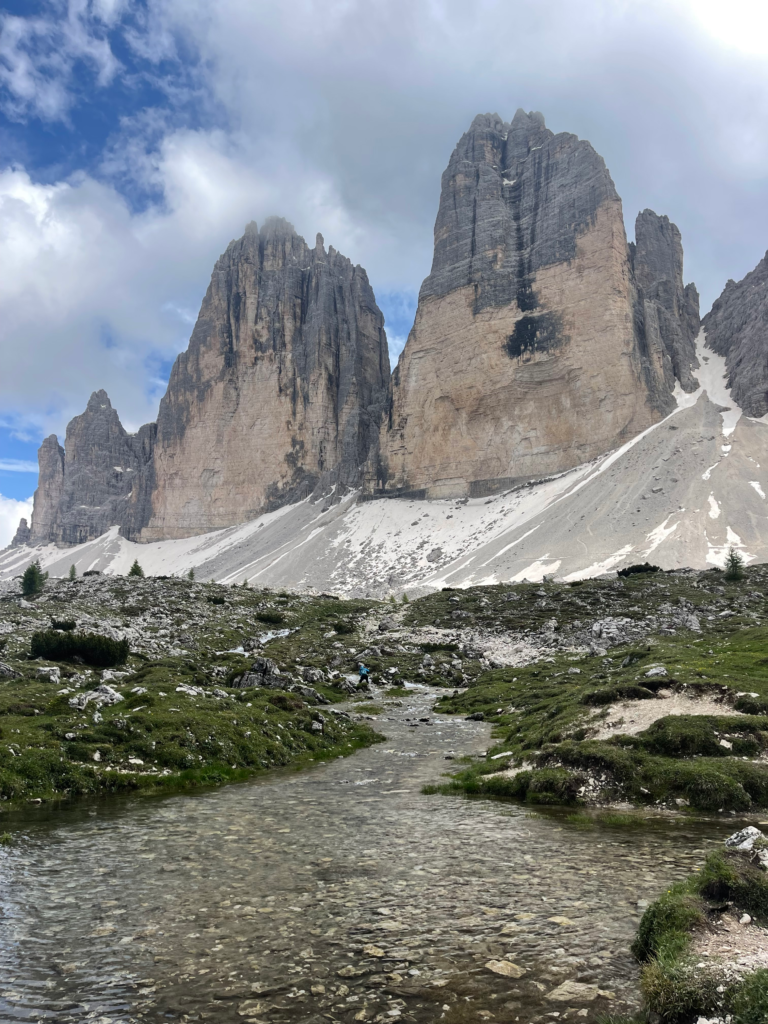
Rifugio Locatelli, wasn’t open yet—it usually opens for the season on June 28th and stays open through September. So instead of a hot meal, I pulled out a wrap and one of my trusty granola bars and settled in with the view. Honestly? Not a bad trade-off. It was quiet, and the scenery was everything I’d hoped for.
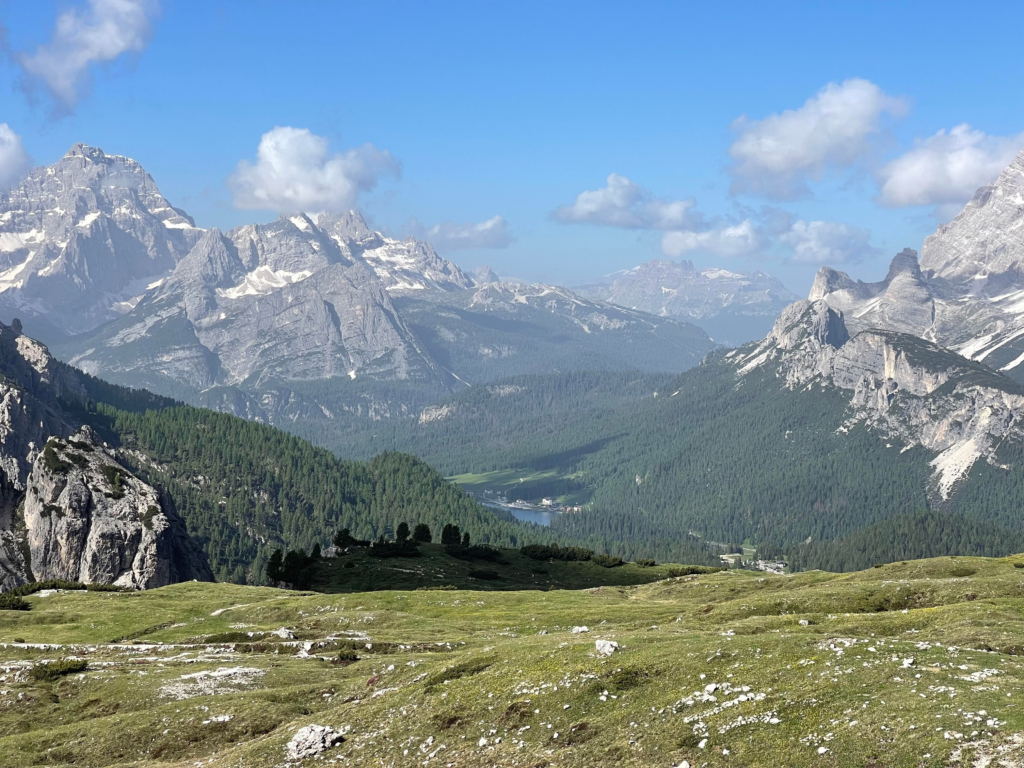
The view of Tre Cime and the reflective alpine lakes? Unreal. It felt like the mountains were showing off—and I was there for it.
The view of Tre Cime and the reflective alpine lakes? Unreal. It felt like the mountains were showing off—and I was there for it. I decided to explore around the backside of the Rifugio and even opted to go up to Sasso di Sesto/Sextenstein.
This was a nice refuge from the crowds below. It was quiet, and no one was around. I wish I had taken the time to explore a bit more and go further,r but I decided to go back down to Locatelli and Laghi dei Piani.

The Back Half of the Tre Cime Loop Had to Be My Favorite
After my sidequest, I picked up trail #105. It loops around the far side of the peaks, through a quieter valley. There’s a decent little uphill section over a rocky ridge—probably the hardest part of the loop—, but it’s short. And you’ll feel like a champ after.
Next comes Malga Langalm, where there’s another rifugio if you need to rest again. I didn’t stop, but it’s nice knowing it’s there. The last leg takes you back to Auronzo with views that feel like a final bow. I passed two mirror-like ponds that reflected the peaks perfectly. And just when I thought I’d seen it all, the Cadini peaks popped back into view.
How long did the hike take, and How Busy is Tre Cime Di Lavaredo?
The loop took me about 2.5 hours, with time built in for snack stops, photos, and soaking in the moment. But let’s be real—this is one of the busiest trails in the Dolomites. If you’re hoping for peace, quiet, and solitude, this probably isn’t the hike for you. It’s iconic for a reason, and with that comes the crowds. That said, other routes in the area offer quieter, equally beautiful alternatives. If you’re looking for something less popular, I’ve got you covered.
I’ll be listing several Komoot trail alternatives below that you can try if you want a more off-the-beaten-path Tre Cime experience. The trail was busy, but not in a bad way. People were kind, said hi, and shared the trail with a smile.
I walked back into the gravel lot where the buses meet, tired, happy, and completely in love with this part of the Dolomites. From here, the Dolomiti bus dropped me off at the Misurina bus stop.
Easy Day Hikes in the Dolomites: Pale Di San Martino
Click here if you are looking for something a little gentler—but still jaw-droppingly beautiful—don’t miss my guide to Val Venegia and Sentiero Marcio, one of the easiest and most scenic hikes in the Dolomites. If you’re nervous about hiking solo in the Dolomites, this is a great one to start with. It’s well-marked, filled with fellow hikers, and offers just enough challenge to leave you feeling strong by the end.
Essential Gear & Packing
As a solo hiker, I double-checked my kit before setting out.
A sturdy daypack like the Osprey 38L has enough room for water, snacks, layers, and my Sony Alpha a7 II camera (for sharp landscape shots). I also brought my Canon Rebel EOS T7 because at the time I had a 70-300 lens for this camera.
Without a doubt, you’ll want comfortable hiking boots. These are my favorite pair of Hiking boots that I am currently obsessed with

Please do not wear tennis shoes or flip flops. You wouldn’t believe the things you see people wearing out on the trails. Please take the hike seriously and follow all signs posted!
Safety Tips for Solo Hikers in the Dolomites:
Hiking solo in the Dolomites?
You can absolutely do this—but a little planning goes a long way. I felt totally safe the entire time, and honestly, this is one of the safest, most well-trafficked areas in Europe to hike on your own. You’ll see couples, families, and yes, plenty of other solo hikers too.
Here’s how I prepped (and what I recommend you do too):
Tell someone where you’re going.
I always share my plan with a friend and let the hotel staff know, just in case. Even a quick “I’ll be back by dinner” message adds that extra layer of peace of mind.
Check the weather and be smart with daylight.
The Dolomites can be sunny one minute and stormy the next. I like to start hikes by 8 AM—especially in June—so I’m off the trail before afternoon clouds roll in. Always pack a light rain jacket or fleece. Wind chill at elevation is no joke. Layer like a pro. When I started the Tre Cime loop, it was cold enough for a fleece. By midday? Full sun and warm. I had a base layer, a fleece, and a lightweight rain shell.
Plus: sunscreen, hat, and sunglasses were non-negotiables.
Water and snacks. Always. I carried 2L of water (minimum), a couple of granola bars, and a wrap. Sure, there are huts along the trail—and they’re awesome for refills or grabbing a Coke—but I never rely on them as my only food or water source. You never know if they’ll be open (Locatelli wasn’t when I went), so be prepared.
Altitude awareness.
The trail isn’t super high, but it’s high enough (~2300m) that you might feel it. I paced myself and took breaks whenever I needed. If you feel dizzy or lightheaded, take a pause, drink water, and breathe.
Pack smart.
My go-to is the Osprey 38L pack—roomy, light, and fits everything I need. I keep things snug so they don’t shift, and I always carry trekking poles for stability (especially on early morning trails that might still have ice).
Komoot and All Trails
I use offline maps (Komoot is my go-to), and I carry a portable charger.
While the Tre Cime loop is well-marked and super clear, it’s still smart to have a map downloaded just in case. Don’t count on cell service, especially once you’re behind the peaks or in valleys. None of this has to be scary—it’s just smart. Hiking solo is one of the most empowering things I’ve ever done, and with a little prep, you’ll walk into that trail feeling confident and totally capable.
Final Thoughts on Hiking Tre Cime Di Lavaredo Solo
If you’re dreaming of hiking Tre Cime di Lavaredo solo, you can. Tre Cime is the perfect introduction. It’s dramatic without being too demanding, and there’s something really special about walking it alone. This hike reminded me that I’m capable. That solitude can be beautiful. And that the world is a little less scary when you just lace up your boots and go. Save this post if you’re planning your own Dolomites adventure, and let me know in the comments if you have questions. You’ve got this. I promise.